
Stick Welding Tips To Sincerely Improve Your Work – Plus Our 12 Welding Tricks
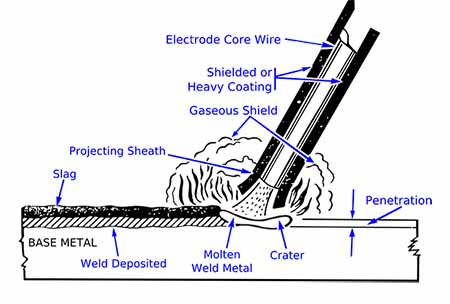
The welding process which uses electricity to create heat to melt the metals and lead on to joining of these metals.
The stick welding has many disadvantages like lower efficiency, need skilled users, and unsuitable for thin metals. There are some very common issues with the stick welding like spatter, a common and unwanted side effect with porosity, undercut, deformation, cracks, slag inclusions, incomplete fusion & penetration, and wire delivery delay.
The new welders who do not weld every day the stick welder known as shielded metal arc welding (SMAW) machine is really a difficult process to learn. The experienced welder once working makes the stick welding look easy.
The beginner and the welder who wishes to deliver better results with stick welding needs to pay attention to the basic five rules for the betterment of the welding results. They are the current setting in the machine, length of the arc, angle of travel, speed of travel, and manipulation of the electrodes.
Preparation for Stick Welding
To begin with, stick welding first cleans the surface by wire brush or grinder for better results. There should be a clean spot for the work clamp. A stable, solid, and good electrical connection is required for the maintenance of the better quality of the arc.
Keep an unobstructed view of the weld puddle by keeping your head to the side out of the weld fume. You ensure while welding in the joint keeps the arc on the edge of the welding puddle. Keep yourself placed such, to support and manipulate the electrode.
We have to stick to the following point strictly to improve with our welding process continuously with every next arc welding process.
Step 1, Current Setting in Machine
The electrode manufacturer supplies different electrodes, so the current setting will depend upon which electrode you choose to weld. The choice of the electrode will decide whether you choose a DC positive (DCEP), DC negative (DCEN), or AC/ alternating current.
The different machines have the ability to weld one or both of these modes, so you choose the electrode as per the machine specification and compatibility to weld.
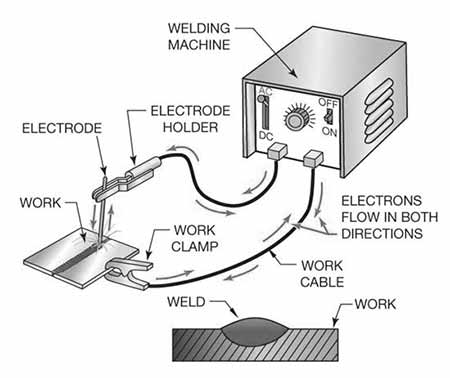
Both the current types produce different arc characteristics and are used for different purposes. The thicker material needs DC+ as it gives more penetration while AC+ is good when we are welding the thin materials due to less penetration with the same ampere.
Once the current is set in your machine then amperage is needed to set. The starting point for the ampere seems 1 amp/.001 inch of electrode diameter. You are required to set the ampere as per your arc characteristics. You may increase or decrease the ampere depending upon the need.
Step 2, Arc Length
The definition of arc length is the distance between the electrode and the weld puddle. The arc welding is also known as a constant current welding process as the control of your welding voltage is proportional to arc length.
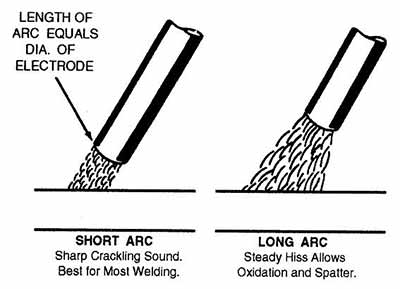
To maintain a steady arc is the hallmark of the stick welding and a rule of thumb is to keep the arc length the same as the diameter of the electrode. If one observes that the electrode got stuck in the weld pool means arc length is short. In the case of a long arc, one may get excessive spatter, low deposition, undercut, and porosity.
To the beginner in stick weld, it happens generally a longer arc to better visualize the weld puddle. In case of trouble seeing the weld pool, it is better to tilt the head than to increase the length of the arc. One can develop a stable, tight, and controlled arc to make a better bead, narrow bead and minimum spatter.
Step 3, Travel Angle
A drag or backhand technique of welding is used while doing stick welding in flat, horizontal, and overhead positions. It is customary to hold the electrode in a perpendicular position and then tilt the top in the travel direction by 5 to 15 degrees.
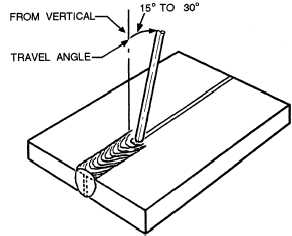
The best result may be achieved when a 10-15 degree of drag or pull is used in the stick welding process.
Step 4, Electrode Manipulation
Welding is an art and everyone evolves his own way from running a steady line to whip & pause motion etc. One does experiment and develop a method which suits him better.
Sometimes a slight wave arc is required to weld the gap so the manipulating electrode is required to produce a stable, small, and strong bead with very few spatters with minimal porosity and slag inclusion.
Step 5, Travel Speed
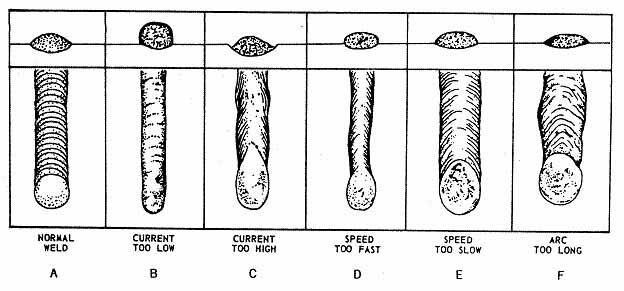
We should try to set the travel speed in such a way that the arc to be in the leading 1/3 of the weld pool. The too-slow speed will produce a wide, convex bead with shallow penetration and cold trapping as well. The slower speed instead creates a narrow, undercut, crowned bead and inconsistent.
All the above tips and patience and practice will move you in the right direction to improve in stick welding and produce a better, strong, stable bead.
Tips & Tricks to Improve Your Stick Welding
These tips and tricks will assist you to resolve the issues a welder may face. “Keep practicing, stay committed, and be persistent”. The stick welding tips and tricks:
1. Every time pick normal steel – When learn to stick weld, choose the steel with minimum sulfur and silicon content. The steel of grade 1015 and 1025 work fine for stick welding because of lower than 0.035% sulfur, 0.1% silicon.
Heavy and rigid plates with high sulfur and silicon content will crack on trying to weld. If it is really required to weld them, use a small electrode, slow speed, to make the weld puddle molten for a longer period of time.
2. Select the correct position of joint and electrode – The flat position is best suited for metals of 3/16 inches thick or more.
The sheet of 18-10 gauge steel can weld best when working at a downhill angle of 45 degrees but never exceed this beyond 75 degrees for the quality weld.
3. Make Use of Proper Joint Geometry – It requires The bevel for the better bead as the electrode will remain struggling to reach the joint otherwise. When you learn to stick weld a strong, clean, and fully penetrated joint, you can achieve it by following the joint geometry.
4. Clean Each Joint before Welding – Better to remove extra rust, paint, oil, scale, and grease on the metal or else use electrode E6010 or E6011 for such a situation. The circumstances of rust, moisture welding should be slowed down. This will allow the gas bubble to shoot out of the weld pool before it cools to freeze.
5. Take charge of the buildup – The quality stick welding produces a buildup, not over 1/16 inches thickness. You are wasting time and material adding no extra advantage. More increase in fillet just adds to the cost and wastage of time. It will put in extra weight and additional cost to the project.
6 Choose the correct electrode – Thumb rule is a larger electrode weld at a higher speed and deposit high. Choose the largest electrode for your project maintaining the quality of the weld. The dimensions of the joint may limit the electrode diameter.
7. Lowering current decreases spatter – Spatter is an aesthetic issue and does not have any bearing on the strength of the weld but will add to the cleaning cost. Reduce the current in the type and size of the electrode to lessen the spatter. A shorter arc length will help to reduce the spatter as well.
8. Maintain the feasible size of a weld pool – Undercut is another aesthetic issue common with the beginner. This can be reduced by keeping the weld molten pool manageable. Reducing the current, slowing the travel speed, eliminating weaving tendencies will help to avoid undercut.
9. Pick a heated cabinet for electrodes – Damp electrodes will produce an erratic, rough, and inconsistent arc. It is advisable to invest in a portable oven/heated cabinet to maintain the dryness in the electrodes.
10. Minimize lack of fusion affairs – Lack of fusion means an unsuccessful weld. Higher current with a stringer bead technique may help in the issue, lack of fusion. We ensure clean edges, beautiful-looking, strong weld.
Poor fusion because of shallow penetration reduced by slowing the travel time and increasing the current. A better fit-up can rectify the fit-up problem of poor fusion.
11. Carry out a dry run – it is a prime help, you perform a dry run with the electrode before you start actually welding in a tight spot. The exercise will clarify the obstacle you feel while doing arc welding. Conclude before you start the angle at which arc welding will remain easy. The strategy can be planned beforehand.
12. Welding a Fun – Feel proud about your work. Your work on steel will remain for a longer time. Admire yourself that you are the reason for this creation. “Welding time, Fun time”
Every mistake is an opportunity to learn not a reflection of failure.
Frequently Asked Questions
What creates a welding electrode to stick?
The immediate cause of sticking the welding electrode is when instead of melting it just sticks. The causative agent seems there’s inadequate current to melt the rod. It is better to immediately jerk off the rod from the base metal.
Which one is the easiest welding rod to use?
Electrode number 7018 having the thick flux and high content and find it to be the easiest electrode to use. These welding rods produce the clean, smooth, stable, and consistent arc with the least spatter and good arc penetration. These may be used in structural formation by many welders.
What angle should you weld at?
Ideal angle to weld is at 60-70 degree. A fillet is the commonest type of weld and in a flat horizontal position, keep the holder at the 45 degrees from the welding piece.
What is the most common welding electrode used?
There are six types of welding rods 6010E, 6011E, 6012E, 6013E, 7018E, and 7028E, but 6010 is the most commonly used welding rods. It produces a tensile strength between 60,000 pounds/square inch. It is possible to use this rod in all four positions, vertical, horizontal, flat, and overhead with equal ease.
What is the strongest welding electrode?
We find the welding electrode 6011 is producing a minimum of 60,000 psi tensile strength. The welding electrode 7018, on the other hand, produces a stronger weld with minimum tensile strength between 70,000 psi.
What is the difference between the 6013 and 7018 welding electrodes?
Both the electrodes have basic material of mild steel while coatings are different. The 7018 is embedded with low hydrogen potassium coating and 6013 has a coating of Titania potassium. They differ in welding drop rate and tensile strength, undoubtedly 7018 has a higher specification.
Which metal is the hardest to weld?
Aluminum is the hardest and sometimes even a nightmare for a welder. The chemical and physical properties need to study before venturing to weld it. The alloy or ore form needs a vigilant examination of the metal for the welding.
Do you push or pull in stick welding?
Leisner rule says “If it produces slag, you drag,” Here in arc welding/stick welder, you drag or pull the rod or wire. Push is the technique with MIG welding.
Why does my welding rod keep sticking?
Arc welding electrodes stick to the base metal because of low current/voltage. This reason is predominant but there may be reasons like using low OCV welder or wrong welding technique.
Conclusion
Every welder aims to obtain a clean, consistent, and stable arc for fine welding for his welding project. We have discussed the details of stick welding techniques and training. Arc welding tips and tricks will sail you out from the toughest situations of welding. A novice welder should keep this directive guide for the best stick welding.
The selection of proper electrode, power source, welding technique, and welding joint is of prime importance to achieve beautiful and strong welding.
Thank you for sparing your time to scan the stuff. Your question helps us to strengthen further in welding. Now it’s your turn to comment and question.
You Might Also Like…
12 Different Types Of Welding Processes
Arc Welding Machine Work Instructions
Resources to Keep Reading…
