Understanding the Welding Symbols [Explained with Diagrams]
How this engineering tool of welding can be placed fittingly unless we evolve a process to convey complete information from its planner to workmen.
Welding symbols furnish with a procedure to place every information on the drawings.

Achieving a training certificate of a professional welder is insufficient until you know how to read the draftsman’s drawing prior to welding. The sketch of welding symbols becomes a headache if you are not familiar with the basics of these symbols.
This set of symbols simplifies communication between the planner and the workmen. Welding symbol is a very well-drafted language to master for better employment worldwide.
Most welders have a hard time interpreting welding symbols and the market is running short of trained welders. It is not feasible for small and medium-sized companies to make this language a prerequisite for employment. My suggestion for them is to hire a third party to help your crew with this language. We are also offering you this tool to download welding symbols pdf to educate your team.
Welding Symbols
Numerous tests for types of welding symbols are available to secure your qualification and certification. This language appears strange but can be mastered step by step knowing each symbol. To grasp these symbols, bit by bit is crucial to gain your qualification. You can reach the pinnacle of your career following this symbol guide. We will detail out the study of the welding symbols chart now.
Some of these symbols look tricky, but once they are broken down, they look comparatively simple. These symbols are a demonstration of pre-weld joint details as seen on the side and cross-section.
We will explain two systems of interpretation system A and system B and following four sections of symbols.
- The base platform
- Base butt weld symbol
- Other base symbols
- Supplementary symbols
Each section and system requires learning collectively as individually no one is meaningful.
1. The Base Platform

The base platform is a simple depiction of the welding and surrounding details in three parts.
- The horizontal reference line – The place to put details of type and location of welding
- The arrow with the leader line – The arrow with the leader line intersects the reference line to point the location of the welding.
- The tails line – It is at the other end of the reference line and forks off in two lines. This is an optional line to add the complimentary details different from the specifics. It may include welding typed, welding equipment, welding standard, and any other specific to this particular project.
Two Types of Drawing Systems
Two systems of base symbols drawing are handy and each explained differently. A plan will have a clear mention of system A or B but definitely not both in one draft.
| System A | System B |

System A

System A is characterized by a dashed line below the horizontal reference line. The image here displays the welding symbol on the dashed line, so place the weld opposite to the arrow. Welding symbol above the reference line is advised to place the weld on the side of the arrow.
System B

System B does not have any dashed line under the horizontal reference line. When you see the welding symbol below the reference line the welding to place on the side of the arrow. If we notice the weld sign is above the reference line the welding to be done opposite to the arrow.
2. Base Butt Symbols
Once two plates sit flat and aligned straight and parallel by butting to one another end to end. These joints are two types.
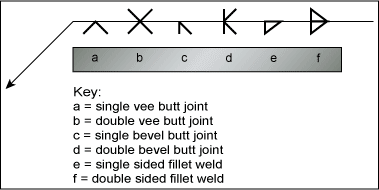
- Single-sided Butt Welds
- Double-sided Butt Welds
Single Sided Butt Welds
The butt weld symbol exhibits the welding requirement, preparation, type of weld, and site. The one-sided weld can be promptly recognized from the symbols.
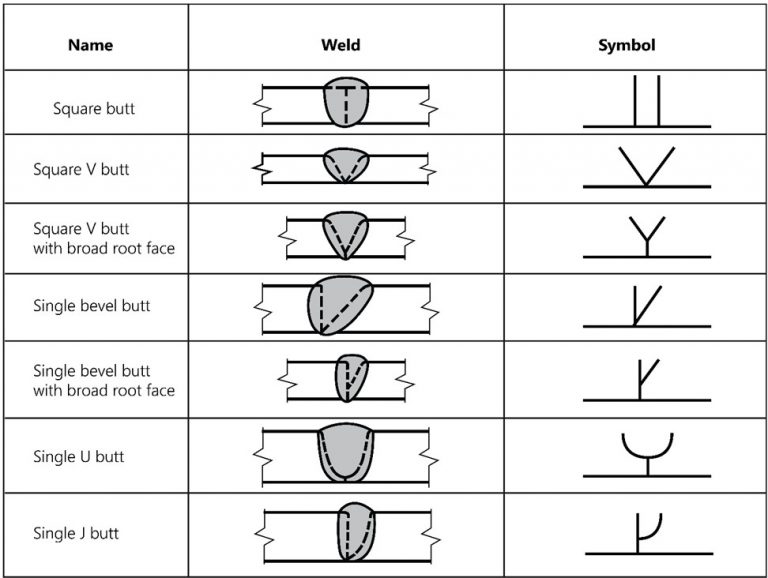
Square Butt Weld – The square butt weld symbol displays two plates with square ends and two square angles. No welding preparation is required in such a situation.
Single V Butt Weld – The two plates form an angle of 45 degrees. The one side of each metal plate at 45 degrees with full depth into the material.
Single V Butt Weld with Broad Root Face Weld – As n single but here the weld preparation of 45 degrees on one side of both the plates. This welding goes down to 3/4 of plate depth, leaving a segment of substance below. This joint reproduces a symbol of Y.
Single Bevel Butt Weld – The angle of 45 degrees cut on one side of the plate while the other end remains square as visible in the symbol.
Single Bevel Butt with Broad Root Face – The 45 degrees bevel on one side while the other one is square, but it does not reach the base as shown in the symbol.
Single U Butt Weld – To follow the symbol of U both the plates have a corner cut out in 1/4 moon while 3/4 of plate gauge deep through the section of joint.
Single J Butt Weld – Here one plate has a corner cut in 1/4 moon while another plate is a square end and it does not go deep to the base as shown in the symbol.
Double Sided Butt Welds
This type is similar to the single-sided butt welding except that both the surfaces are prepared and welded.
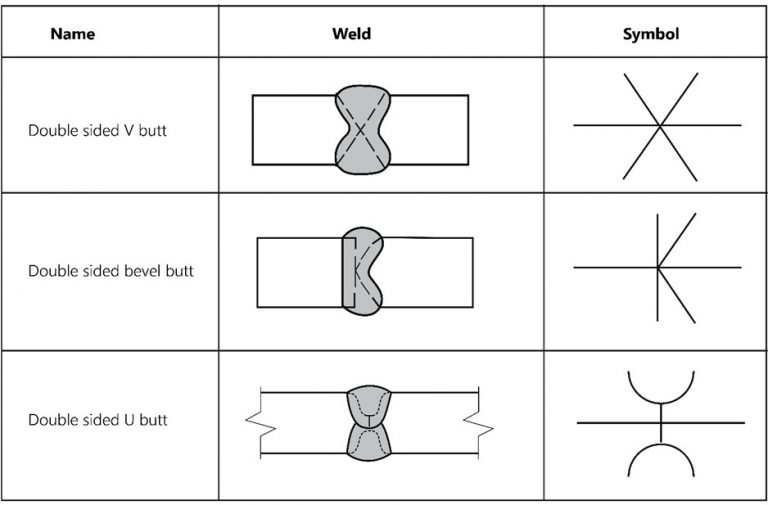
Double-sided V Butt Weld – Each plate here cut 45 degrees bevel cut up to half the depth. The same can be done on the second side making a symbol X in shape. The joint is in the full length of the plates.
Double-sided Bevel Butt Weld – Here one plate has a bevel of two 45 degrees up till the middle. The second plate needs no weld preparation and keeps the corners square. The welding looks like a letter K.
Double-sided U Butt Weld – Both the plates undergo 1/4 moon cut out leaving the 1/4 to 1/2 plate gauge in the center. On joining sheets with weld we get a U shaped as in the picture.
3. Other Base Symbols
The commonest type of joining is by butt welds and fillet welds. Contrary to butt welds the fillet welds exhibit the supplementary symbols compute additionally to fillet weld. We have the following base welding symbols which are not butt weld, including the fillet weld symbol.

Fillet – This is roughly a triangular cross-section. It deposits the metal in a corner of the fit-up of two sheets, fuses with the base to form a joint. The commonest joint between two plates, which are at a right angle to each other.
Plug Weld – The two plates are used here one with a hole that sits on another plain metal plate. The plug weld fuses the 2 plates together by joining at the hole. The plug weld symbol displays the plughole in a cross-section vista of the top metal plate.
Resistance spot weld – The symbol is a circle similar to the shape of any spot weld. We create the spot with electrical resistance heat.
Resistance seam weld – The spot welding of seam shows two parallel lines through a circle giving a depiction of seam weld with a length like a slot shape.
4. Supplementary Symbols
These symbols further clarify the welding characteristics, how and where to weld, and what is the final finishing need of the weld in a project.
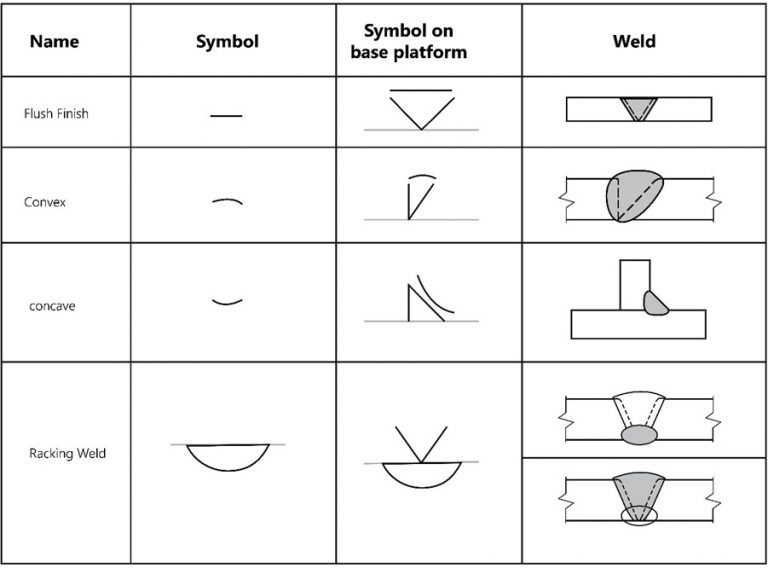
Flush Finish – This symbol explains what we need when finishing the process. The surface should be in a straight line with the level of the plate. This can be gained by machining or grounding of the weld joint.
Convex – The display of the symbol shows a curve outwards like a balloon from the weld surface.
Concave – The symbol looks like an inside of a bowl, concave in shape. The fillet weld generally finishes a concave surface.
Backing weld – The bottom of the weld preparation for V or U, it performs initial small weld at the bottom. This will add a substance to the complete weld. The symbol of it is a curved line beneath or on the top-tier of the base symbol, depending upon the side of the baseline.
Weld between points symbol – The drawing shows two points that require welding. The arrow between two points indicates the full-length welding between the marks.
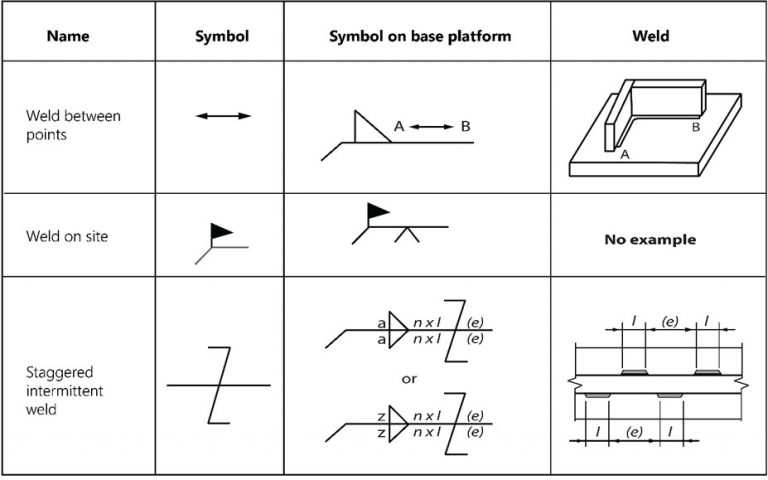
Weld on-site symbol – The flag is a symbol to specify the on-site welding, not in the workshop. It locates the flag at the original site in the country where the project demands to be completed.
Intermittent staggered weld – The staggering is required across the section from one side to another intermittently. Weld as stitches across the than to full-length weld bilaterally. The Z shaped symbol with a line through the center displaying the result of 7 in a mirror. It shows two 7 equal in size flipped making a Z. The staggered intermittent is equal on both sides but flipped.
Designations of Welding Processes by Letters
When the symbols related to the welding process need clarification on the draft, then the letter designations require. We place these letter designations on the tail of the horizontal line.


When no specification, process of welding, the tail should be omitted as below

You Might also Enjoy…
12 Different Types Of Welding Processes [The Definitive Guide]
4 Best Ways For Stainless Steel Welding [A Quick Guide]
Cast Iron Welding Procedure [Step-By-Step Guide]
Question and Answer Session
What do weld symbols mean?
This is a language to communicate between planner and welder. The baseline and the arrow point towards the area where the joint is to make. It includes the complete knowledge about the welding process, welding equipment, place, shape of the weld.
Explain the basic welding symbols?
The arrow connects the welding symbols with a horizontal baseline to the outer plane of one sheet of the joint at the center of the required weld. These are clearly available for resistance spots, seam, projection, arc, and plug weld symbol.
What is the symbol for field welding?
The weld symbol consists of a Flag which is placed at the intersection where the arrow meets the reference line. This flagpole indicates a field weld not a shop weld.
How to draw welding symbols?
An arrow points toward the area over the drawing draft where the welding is needed. This arrow is attached to a leader line that intersects with the horizontal line. The tail of the symbols which is opposite to the arrow has the rest of the information.
Final Words
I have enumerated step by step as a guide to learn the welding symbols. By this time you are confident that this language of communication between planners and workmen is not difficult. We have completely grasped it for the project. Download the pdf version of this welding symbol guide for ready reference.
Most welding machines come with a commonly used chart inside the frame, knowing these welding symbols means you will be able to easily understand the use of such tools. It also gives you extra power when choosing the best welding machines for your desired use.
We may use this for the welding according to the drawing of the project. This manual will help you in passing the examination and certification course. We are available for any assistance while working on your project.
Now I would like to hear from you in my comment box. Feel free to ask a question.
Download here welding symbols pdf